陈拓 2021/04/09-2021/04/15
1. 概述
https://zhuanlan.zhihu.com/p/359395794
https://blog.csdn.net/chentuo2000?spm=1000.2115.3001.5343
一文中我们通过树莓派的apt源在树莓派上安装了mosquitto MQTT服务和客户端。
因为apt源的更新有滞后,所以我们安装的是mosquitto 1.x版本。
本文我们下载最新的mosquitto 2.x源码进行编译安装。并且用源码编译安装后系统中就有了用C语言进行MQTT开发相关的头文件和库文件。
2. 下载源码
可以从两处下载源码。
- 从github下载
https://github.com/eclipse/mosquitto

- 从官方网址下载
我们从官方网址下载源码。
https://mosquitto.org/download/

右击红框,复制链接地址:https://mosquitto.org/files/source/mosquitto-2.0.9.tar.gz
在树莓派上下载源码:
wget http://mosquitto.org/files/source/mosquitto-2.0.9.tar.gz

3. 解压
tar -zxvf mosquitto-2.0.9.tar.gz
![]()
4. 编译
- 进入源码目录
![]()
- 编译,出错
make
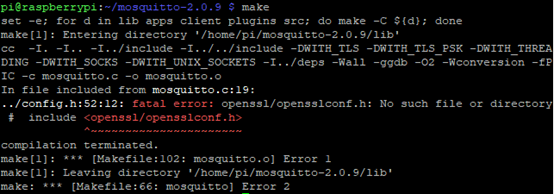
找不到openssl/opensslconf.h
安装opensslconf.h
sudo apt-get install libssl-dev
![]()
- 再编译,出错
make

找不到cjson/cJSON.h
安装libcjson libcjson-dev
sudo apt-get install libcjson1 libcjson-dev
![]()
- 再编译
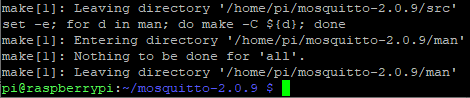
成功。
5. 卸载老版本
- 当前版本
mosquitto -v

这个命令用于启动mosquitto,所以最后一行显示地址已经使用。
- 查看mosquitto进程
sudo ps -ef | grep mosquitto

- 杀mosquitto进程
sudo kill -9 458
![]()
- 查看安装的mosquitto包
dpkg --list mosquitto

- 卸载旧的mosquitto包
sudo apt-get autoremove mosquitto

6. 安装新版本
- 安装
sudo make install
![]()
- 重新启动树莓派
sudo reboot
![]()
- 查看mosquitto进程
sudo ps -ef | grep mosquitto
![]()
mosquitto未启动,不能开机自动启动,后面我们会配置开机自启动。
- 查看帮助
mosquitto -h

当前版本:mosquitto version 2.0.9
mosquitto是一个MQTT v5.0/v3.1.1/v3.1代理。
用法:
Usage: mosquitto [-c config_file] [-d] [-h] [-p port]
参数说明:
-c : 指定代理配置文件
-d : 代理启动之后进入后台运行
-h : 显示帮助
-p : 以指定的端口启动代理监听。不建议与-c选项一起使用
-v : 详细模式 - 启用所有日志类型,并在终端打印调试信息。此参数覆盖在配置文件中给出的任何日志记录选项。
更多信息见https://mosquitto.org/
7. 本地测试
下面开三个终端窗口进行测试。
- 启动mosquitto服务
先打开一个终端窗口,输入mosquitto -v:
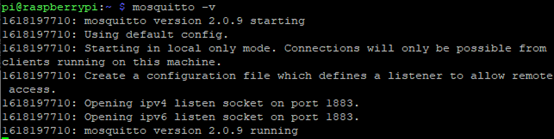
使用默认配置,以本地模式启动,只能从运行在本机上的客户端连接。如果要从远程访问,需要创建一个配置文件,我们将在后面创建这个配置文件并测试远程连接。
- 订阅主题
mosquitto_sub -d -v -t test_topic

订阅主题test_topic,等待接收消息。
参数说明查看帮助:mosquitto_sub --help
-d : enable debug messages.
-v : print published messages verbosely.
-t : mqtt topic to subscribe to. May be repeated multiple times.
- 发布内容
mosquitto_pub -t test_topic -m "hello!"
![]()
发布主题为test的消息Hello!
参数说明查看帮助:mosquitto_pub --help
-m : message payload to send.
- 订阅窗口显示接收到的消息
![]()
8. 设置配置文件
使用默认配置,如需修改服务器的配置信息需要修改:
上面的测试使用默认配置,只能从运行在本机上的客户端连接。如果要从远程访问,需要创建一个配置文件。
默认的配置文件是/etc/mosquitto/mosquitto.conf,自定义的配置文件是/etc/mosquitto/conf.d/mosquitto.conf。两者之间的联系是这样的,先装置默认配置文件/etc/mosquitto/mosquitto.conf,再通过中的include_dir指定的目录装置定义配置文件/etc/mosquitto/conf.d/mosquitto.conf。在目录/etc/mosquitto/conf.d中所有扩展名为.conf的文件都将被装置。
使用下面的命令装载自定义的配置文件:
mosquitto -c /etc/mosquitto/mosquitto.conf
- 重新启动树莓派
sudo reboot
![]()
- 复制mosquitto.conf
为了使用新版本配置文件模板/home/pi/mosquitto-2.0.9/mosquitto.conf,需要将它复制到/etc/mosquitto/conf.d目录下:
sudo cp /home/pi/mosquitto-2.0.9/mosquitto.conf /etc/mosquitto/conf.d/mosquitto.conf
![]()
- 编辑/etc/mosquitto/conf.d/mosquitto.conf
sudo nano /etc/mosquitto/conf.d/mosquitto.conf
![]()
我们修改下面几处,去掉注释符号,修改默认值(注意和1.x旧版本不完全相同):
user mosquitto
max_queued_messages 1000
message_size_limit 0
allow_zero_length_clientid true
listener 1883
autosave_interval 1800
autosave_on_changes false
persistence false
persistence_file mosquitto.db
allow_anonymous false
Password_file /etc/mosquitto/passwd.conf
- 设置密码文件passwd.conf
https://zhuanlan.zhihu.com/p/359395794
https://blog.csdn.net/chentuo2000?spm=1000.2115.3001.5343
一文中的“生成账号密码”。
9. 指定配置文件启动mosquitto
- 指定配置文件启动mosquitto
mosquitto -c /etc/mosquitto/mosquitto.conf -v

- 有一个Note
Note: It is recommended to replace `message_size_limit` with `max_packet_size`.
将message_size_limit 0注释掉
将max_packet_size 0前面的注释去掉
对于MQTT v5客户端,可以让服务器发送maximum packet size的值,该值将指示客户端服务器不接受大小大于max_packet_size字节的MQTT数据包。这里指完整的MQTT数据包,而不仅仅是有效载荷。将此选项设置为正值将最大数据包大小设置为该字节数。如果客户端发送大于此值的数据包将被断开。这适用于所有客户端,不管他们使用的是哪种协议版本,但是v3.1.1早期的客户端当然不会收到最大的数据包大小信息。默认为无限制。禁止设置为低于20字节因为它可能会干扰普通的客户端操作,甚至非常小的有效载荷。
再启动:
mosquitto -c /etc/mosquitto/mosquitto.conf -v

将max_packet_size设置为1024:
- 再试
![]()
有一个错误:Error: Unable to write pid file.不能写pid文件。
10. 解决不能写pid文件问题
- Linux下pid文件的作用
在Linux系统的目录/var/run/下面一般我们都会看到很多的*.pid文件。有些程序会在运行后也会在/var/run/目录下面产生自己的pid文件。那么这些pid有什么作用呢?
(1) pid文件的内容:pid文件为文本文件,内容只有一行, 记录了该进程的ID。 用cat命令可以查看pid文件的内容。
(2) pid文件的作用是防止进程启动多个副本。只有获得pid文件(固定路径固定文件名)写入权限(F_WRLCK)的进程才能正常启动并把自身的PID写入该文件中。其它同一个程序的多余进程则自动退出。
[https://blog.csdn.net/changli_90/article/details/8911191]
- 指定mosquitto.pid文件的目录
修改/etc/mosquitto/mosquitto.conf:
将pid_file /var/run/mosquitto.pid改成:
pid_file /var/run/mosquitto/mosquitto.pid
sudo nano /etc/mosquitto/mosquitto.conf

- 创建用于生成mosquitto.pid文件的目录
sudo mkdir -m 740 -p /var/run/mosquitto
![]()
ls -l /var/run/
![]()
sudo chown mosquitto: /var/run/mosquitto
![]()
ls -l /var/run/
![]()
- 再试
sudo mosquitto -c /etc/mosquitto/mosquitto.conf -v

- 查看进程
另外打开一个终端窗口:
ps -ef | grep mosquitto

问题:重新启动后/var/run/mosquitto目录就消失了。每次都需要手工设置,下面我们让系统在每次启动时自动创建/var/run/mosquitto目录。
11. 让mosquitto启动时自动创建/var/run/mosquitto目录
创建一个mosquitto.service文件系统就可以在mosquitto启动前自动创建/var/run/mosquitto目录。
- mosquitto.service文件的内容
mosquitto.service文件的内容在github上可以找到:
https://github.com/eclipse/mosquitto/tree/master/service/systemd
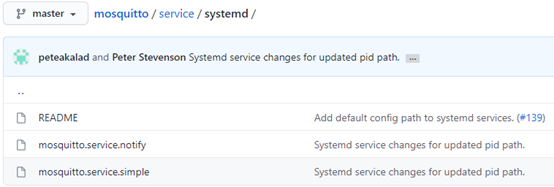
关于mosquitto.service.notify和mosquitto.service.simple的区别,根据编译设置选择适当的systemd服务。如果你编译时启用了WITH_SYSTEMD,使用MOSQUITO.service.notify,否则使用mosquitto.service.simple。详细说明请看README。
- 复制mosquitto/service/systemd/mosquitto.service.simple
https://github.com/eclipse/mosquitto/blob/master/service/systemd/mosquitto.service.simple
[Unit]
Description=Mosquitto MQTT Broker
Documentation=man:mosquitto.conf(5) man:mosquitto(8)
After=network.target
Wants=network.target

[Service]
ExecStart=/usr/local/sbin/mosquitto -c /etc/mosquitto/mosquitto.conf
ExecReload=/bin/kill -HUP $MAINPID
Restart=on-failure
ExecStartPre=/bin/mkdir -m 740 -p /var/log/mosquitto
ExecStartPre=/bin/chown mosquitto: /var/log/mosquitto
ExecStartPre=/bin/mkdir -m 740 -p /var/run/mosquitto
ExecStartPre=/bin/chown mosquitto: /var/run/mosquitto

[Install]
WantedBy=multi-user.target- 创建/lib/systemd/system/mosquitto.service文件
sudo nano /lib/systemd/system/mosquitto.service

注意:修改一下路径:
ExecStart=/usr/local/sbin/mosquitto -c /etc/mosquitto/mosquitto.conf
- 启动mosquitto
sudo systemctl daemon-reload
sudo systemctl restart mosquitto.service
sudo systemctl status mosquitto.service

- 查看进程
ps -ef | grep mosquitto

- 查看服务
service mosquitto status

服务已启动。
- 查看日志
sudo cat /var/log/mosquitto/mosquitto.log

12. 带账号密码认证的本地测试
- 重新启动
sudo reboot
- 查看进程
ps -ef | grep mosquitto
![]()
- 查看服务
service mosquitto status

服务已经自动启动了。
测试的详细说明见《树莓派安装Mosquitto MQTT服务》
https://zhuanlan.zhihu.com/p/359395794
https://blog.csdn.net/chentuo2000?spm=1000.2115.3001.5343
打开两个终端,测试publish 和subscribe。
- 一个终端订阅subscribe主题Topic:test,等待接收消息。
mosquitto_sub -p 1883 -u ct -P xxxxxx -t "test"
mosquitto_sub -p 1883 -u ct -P xxxxxxxx -t test

mosquitto_sub: /usr/lib/arm-linux-gnueabihf/libmosquitto.so.1: version `MOSQ_1.7' not found (required by mosquitto_sub)
出错了。
- 解决问题
查看ls -l /usr/lib/arm-linux-gnueabihf/libmosquitto.so.1
![]()
查看ls -l /usr/local/lib/libmosquitto.so.1
![]()
libmosquitto.so.1版本不一致,旧版本未卸载干净。
复制新版本覆盖旧版本:
sudo cp /usr/local/lib/libmosquitto.so.1 /usr/lib/arm-linux-gnueabihf/libmosquitto.so.1
![]()
再订阅:
mosquitto_sub -p 1883 -u ct -P xxxxxx -t "test"
![]()
成功。
另一个终端发布主题为test的消息Hello!
mosquitto_pub -p 1883 -u ct -P xxxxxx -t test -m "Hello!"
![]()
- 订阅窗口显示接收到的消息
![]()
13. 远程测试
https://zhuanlan.zhihu.com/p/363373024
https://blog.csdn.net/chentuo2000/article/details/115539377
14. 头文件和库文件
用C语言开发MQTT应用程序所需的头文件和库文件现在都有了。
C/C++ libraries for creating MQTT clients.
- lib/libmosquitto.so.1
- lib/cpp/libmosquittopp.so.1
- include/mosquitto.h
- include/mqtt_protocol.h
14.1 头文件
find ~ -name mosquitto.h
![]()
find ~ -name mqtt_protocol.h
![]()
在默认目录下查看:

14.2 库文件
find ~ -name libmosquitto.so.1
![]()
find ~ -name libmosquittopp.so.1
![]()
在默认目录下查看:

参考文档
- MQTT通信协议(mosquitto)在Linux上的环境构建与测试
https://blog.csdn.net/qq_33406883/article/details/107429946